
 An interesting game my daughter recently showed me was Lawn Farkle or Lawn Yahtzee. For these games, you’ll need 5-6 lawn size dice. When I looked on-line, these dice ranged from about $30 up to $100 for a set of 6. Naturally, I thought I should be able to make these with stuff I had lying around. It did turn out to be a bit more work than I expected.
This post is a summary to make these (not so little) gems. I have a more detailed version (with pictures) if anyone is interested.
1) First, you start with a 24” 4×4 or two glued together 2x4s to make about 24 inches that are 3 ½ inches on a side, since we’re going to turn them into 3 ½ inch wooden cubes. Be aware of where the knots in the wood are located, since you may need a longer piece of wood to work around these flaws.
2) If you are using 2x4s.
- If you have a joiner, join the two faces of the 2×4 that you plan to glue together. This will enable an almost seamless connection.
- Glue both faces of the 2x4s you plan to glue together to ensure a strong seam. Make sure there is smooth even coat of water proof glue, since the dice will be used outside.
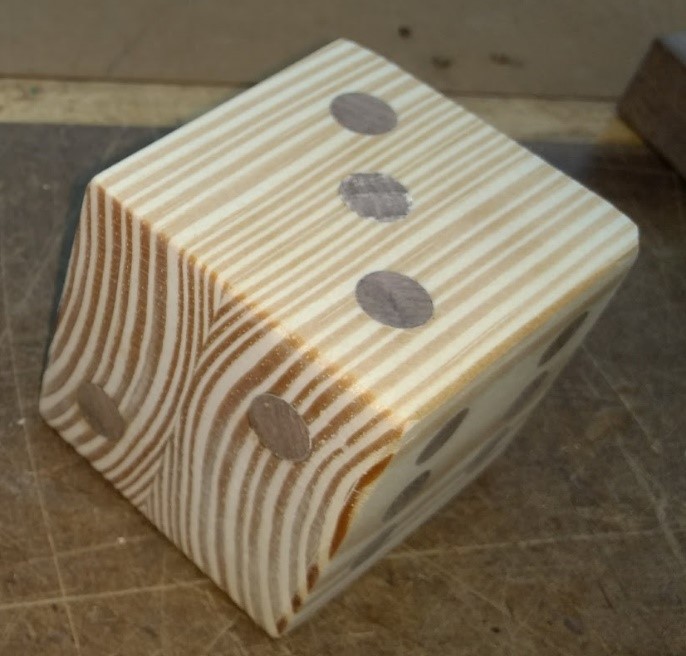
- Clamp them together and wait about 24 hours for the glue to set. You may need to clamp in two dimensions to ensure that boards are aligned. You may want to look at the grain of the wood and how they come together before you glue, to make the desired grain pattern. The end grain of the glued together board formed a pattern like this: )( Essentially, forming an X.
3) If you have a joiner, clean up the side of the wood to make it smooth, square and ready to rip. The joined face is the one that will be placed against the fence of the table saw.
4) You’ll need to rip the board (based on their shortest dimension) to form the square cross-section. Measure the smallest dimension and use that to rip the other dimension to the same size. If you made this out of 2x4s glued together, you’ll end up with a 3×3 (approximately) board after ripping. You may be tempted to use a ¼ inch roundover router bit right now to round off the edges, while the board is still large, but wait — since you’ll likely need to resurface the edges later.
5) Measure the board’s width and use the smallest dimension to cut the board into cubes, using a chop saw. I found it best to measure again after each cut, don’t try to make all the cuts at once, since the saw will take out some of the wood each cut.
7) Next, find a set of dice and use one as a reference and mark the wooden cubes with a pencil, where the faces should be. Use an awl and mark the cubes, where the spots should be located. The following illustration should useful.

8) There are several ways to tackle placing the spots on the dice. You could use a ½” Forstner bit, wood burning, paint, epoxy… This description, will use the Forstner bit to make the hole and then put in a contrasting colored plug. Keep in mind, you’re going to need a large number of these plugs since each dice has 21 spots.
9) Drill the holes in the cube where the awl marks are located. I used a drill press to make the holes and made them about 1/8” in depth.
10) Next you’ll need to use a ½” plug cutter to make the plugs for dots. In my case, I used some scrap walnut strips. The wood will need to be a bit longer than the hole depth cut in the previous step. Keep in mind, you’re going to need quite a bit of whatever material you choose. Go slow when cutting the holes, since it is easy to tear out.
The other choice is to use an appropriately sized dowel and cut plugs to the correct length using a scroll saw. This was much faster than making the plugs.
11) Place some glue in the holes of the cube and insert the plugs you’ve cut. You may need a hammer at this point. I recommend using a waterproof glue since these are going to be used outside.
12) Next, you’ll likely need to trim off the excess wood from the plugs (with a band saw) and sand the face until smooth
13) Finally, you can route the edges with a ¼ inch roundover router bit.
14) You can stain the cubes and use polyurethane or Danish oil… to protect them from the elements. Since two of the faces will be end cut, you may want to use some glue size on these surfaces to minimize the amount of stain that’s absorbed. If you don’t, these faces will be significantly darker. You can either buy glue size or just make it by diluting your wood glue by 90% and painting it on the ends, to fill up the end grain.
15) To roll a set of dice, you’ll need some kind of bucket, large enough to hold them all.
Tools required:
- Pencil
- Table saw to rip the boards into square boards
- Chop saw to make the cubes
- Band saw to trim the spots on the cubes
- Drill Press
- Drill ½” bit or equivalent for the spots (and dowels or a plug cutter if you’re going to fill them in with wood)
- Sander
- Sand paper
- Tape measure
- Rubber Mallet
- Waterproof glue
- Joiner
Games
And pretty much any other dice game you can think of.
